What is Aperture? A Beginner's Guide to Understanding Aperture

3 keys to photography
There are 3 key elements to photography: Aperture, shutter speed, and ISO. These are also known as the exposure triangle. Learning how to use these 3 features on your camera will help you create better photos. In this post we dive deep into one of these elements so you can master how to use it (and then move onto the next 2)!
Related post: The exposure triangle: How to use it to create better photos with your DSLR camera
What is aperture?
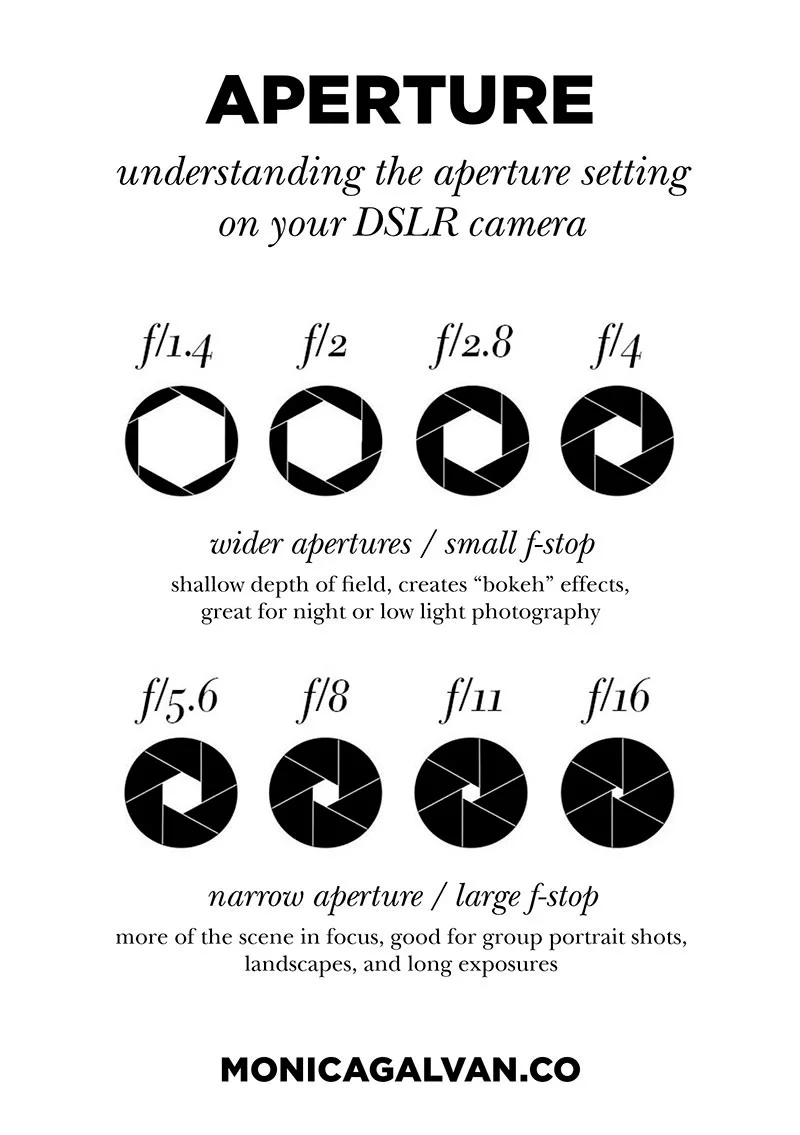
Aperture, also known as an F-stop, is how large of an opening you let light through in your camera.
One stop (f-stop) refers to doubling or halving the amount of light making up an exposure. Adding a stop of light by doubling the exposure will brighten an image. Decreasing by one stop or halving the exposure will darken an image.
The smaller the f-stop number (think f/1.4), the larger the aperture. Seems kind of backwards right? This graphic will help you make the connection.
So the next time you’re wondering which aperture to use in any given lighting situation just think the opposite.
Is it super bright outside? Stick to a smaller aperture (f-stop numbers high like 4 and above). Is it just before sunset and the light is beginning to dim? Use a larger aperture (f-stop with smaller numbers like 2.8 and below).
An important thing to note here is your aperture is entirely dependent on the type of lens you’re using. This is why it’s important to invest in quality glass. You’ll notice most kit lens you receive with your camera don’t go past f/4. This makes it challenging to shoot in low light situations or at night unless you lose a tripod. The larger the aperture (from f/2.8 down to f/1.4), the more light your lens will allow in to capture those night scenes.
A nice side effect of larger apertures (low f-stop numbers) is that creamy bokeh effect. Want to make your subject pop while the background fades beautifully behind? Then use those lower f-stop numbers. On the other hand, if you want your whole scene to be sharp and crystal clear in focus then use a smaller aperture (large f-stop numbers).
When to use a wide aperture / small f-stop
Shallow depth of field
Creates a "bokeh" effect (that blurry, out of focus look we all love)
Low-light situations
Night photography
When to use a narrow aperture / large f-stop
When you want more of the scene sharp and in focus
Group portrait shots
Landscapes
Long exposure photography
How aperture affects a photo
Here are some example photos showing an aperture progression from f/1.4 to f/22.
f/1.4
At the widest opening of f/1.4 you'll notice a shallow depth of field, lots of bokeh as the background fades.

f/2.8
Still plenty of bokeh and fade in the background, slightly more in focus.

f/5.6
More of the scene is in focus.

f/8
Most of the scene is in focus, less background blur with no bokeh effects.

f/14
As the aperture reaches higher numbers, more of the scene is in crystal clear focus.

f/22
At the highest aperture of f/22, you can see the entire scene of the photo.
